Sunday, March 29, 2009

Hard Day on the Links


Well, here is my newest creation. I have been trying to take my golf ball carving to the next level, and I don't mind saying, I am pleased with this one. I started off with the idea of a golf ball after a long hard day on the golf course. As you may know, golf is not as relaxing as people claim, and it is even less so for the golf ball. Ever lost a ball and just couldn't find it? Know why? It is hiding!!!! Maybe after seeing this guy you will understand why.


I made the blanket and pillow from material in my wife's sewing kit. The head board and foot board were made from an old peice of mahogany hand rail I had. I simply cut off a slice (like a peice of bread) and presto! The hands and ice bag were made with self hardening clay which I purchased at a local craft store. I used a packing peanut to give the appearance of shape under the blankets. Then, since a peice of cloth that size will not lay down on its own, I used a bit of epoxy and "locktite" superglue to hold it in place and give it natural draped look. One interesting thing I learned from this project was that packing peanuts and super glue don't mix. The glue literaly dissolved the peanut. I don't know which chemicals caused this, but beware. Thanks for looking. There are more photos at the Picasa web gallery.

Tuesday, March 3, 2009

A Little Help Here!!!


This little guy is in real trouble! Have you ever lost a golf ball in the water? I have, more times than I care to remember. Anyway. I thought I would take my traditional golf ball carving and make it more interesting. I used a peice of old styrofoam and covered it is self-stick green felt to look like the grass. Next I carved out an indentation in the base for the ball to sit down in. Then I used some 5 minute epoxy gel and mixed it with some blue acrylic paint for the water. The gel version of the epoxy is a little thicker which let me give the appearance of ripples. Hope you like it.

Wednesday, February 4, 2009

What to Do When You Can't Carve


I am currently in the middle of remodeling my workshop. Needless to say I haven't had a space in which to carve. In the down time I wasn't sure what to do. I have always like to draw, but have never thought I was any good. Since I can't carve right now, I said, "why not give it a try." I purchased a book on pencil drawing and set my mind to it. I think it has turned out to be a worthwhile investment. Here is a drawing I did from an old photos in my family album. This was done freehand, and all in graphite. I think I am in love with this now! The point is, I think as an artist, whether carving or paint or whatever, it is always important to keep learning. Expand you knowledge. You may not make a career out of it, but you should never allow yourself too much down time. Find something new(preferrably legal) and give it a try.

Friday, January 23, 2009

Afternoon Project


This little guy looks like he might be in need of a stimulus package! I whittled this little guy with nothing but an Xacto knife. He is made of 1 in thick by 2 1/2 in tall piece of pine. Yep, he is a real little guy. Whittling like this can be a lot of fun. On the videos in the bar to the right of the page you can see him before I painted him. This type of carving exercise can be a lot of fun. People really seem to like miniature carving. CAUTION!!!!!! As with all carving, and especially miniature carving be very careful to wear protective gloves. The most important thing to do is never forget the path the knife is travelling. If your finger is in that path, then it is in danger. Just be careful, and have fun!

Saturday, January 17, 2009

I Think I'm an Elf!!!


Hey, this is one of my favorite posts yet! The other day I found a book in the library on "folk toys". In that book I found a pattern for those old acrobat toys...you know the ones where you squeeze the posts and the acrobat does all kinds of flips and spins? Well anyway, as a carver I am always looking for ideas. I took the pattern from that book and used it to carve an acrobat toy instead. The original pattern called for cutting out the pieces from 1/4 in. plywood, so it would be only one dimensional. That is no fun!!! Here are the photos of my finished product. You can also watch a demonstration of it on the cool video I put here.


The point is, that carving makes life more interesting. It took an already awesome toy, and made it stupendous! You can find ideas like this everywhere if you are always looking for a way to let you carving create joy for you!
So, your saying, why the elf title? Well...... this if the first time I have tried making a toy! After the joy it brought me, I think I know how Santa's elves feel. I also wonder how many tissues they go through watching their toys leave home on Christmas Eve.


Tuesday, January 13, 2009

FIRST ATTEMPT AT SELLING ONLINE

Well, I finally attempted my first sale on an online site. Actually two of them. I posted on Ebay and on Etsy. Neither has garnered anything worth mentioning. I haven't had a bid on Ebay, and no activity on Etsy. I think it is going to take some time. Here is an idea I had that I'll see if it works out. I have made some sales in the private sector. Each time I sell a piece, I include a card with my Etsy site, my blog address, and email. That way I am hoping to direct traffic to my site and hopefully generate sales. I have also utilized my local post office bulletin board to post an advertisement for my site. These don't cost me anything extra, so it can't hurt. Time will tell if they are worthwhile efforts. One thing I have learned so far about online selling. "If you post it, they still might not come!"

Wednesday, January 7, 2009

Christmas if Finally Over!


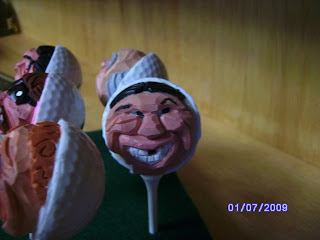
Now, I don't mean to be a hum-bug, but I am glad Christmas is finally over. Now I can get back to carving the way I want to. To tell the truth, I have gotten rather addicted to golfball carving. It as proved to pay off! While at my Folks house over Christmas, my Dad's boss saw some of th golf balls I had carved and commissioned me to carve four more for him to give as gifts to his golfing buddies. I have included pictures of some of the ones I did for him. You really have to have an imagination to carve these things, but they are loads of fun. I will post soon with a tutorial on golf ball carving. Have a great day!